Choosing your workflow
Introduction
The plugin offers a multitude of UV nodes to support different workflows and usecases and this document will cover these in detail. Although you need just one material node to relay your effects inside your material, knowing which one to choose is important.
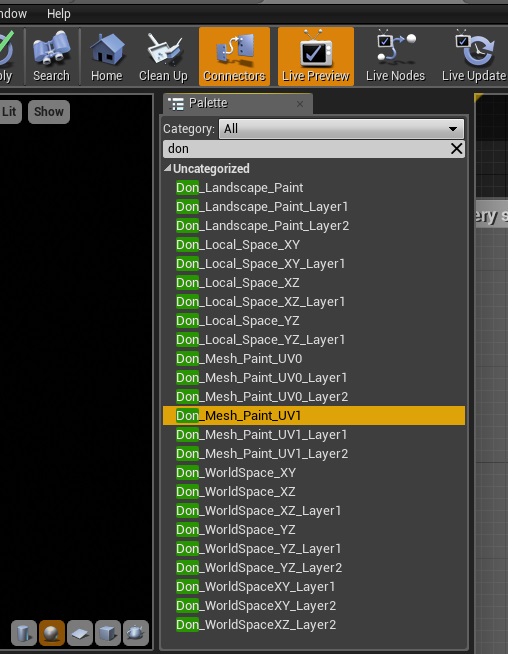
After reading this article you should be able to choose the correct material node for your usecase from the list below:

Your Workflows
The three main workflows supported by the plugin are Mesh-Space painting, World-Space painting and Local-Space painting.
Mesh-space painting supports full 3D painting by using the UV maps of a given mesh to map your paint textures across a mesh, while world/local-space painting are well-suited for 2D/planar paint projection via location based texture mapping1.
Simply put, if your mesh is 2D/planar or has predominantly only two axes you care about (eg: landscapes, floors, walls, etc) then you should favor a world-space/local-space workflow over the mesh-space workflow. What’s more, even if your mesh is non-planar, but your visual effects are mostly 2D, eg: tagging certain actors/meshes in your world with a certain color, even then, the planar workflow is a better choice because they’re simpler to setup, always seamless and perform much faster than their mesh-space counterpart. World-space painting has the added advantage of sharing a single texture layer across the entire world.
Additionally, mesh-space workflow may require a second UV channel (lightmap) on your mesh. This is compulsory for skeletal meshes, for seamless painting or if you need to paint across multiple materials. Static meshes with a single material should strongly consider turning on the setting “Support UV From Hit Results” (under Project->Physics Settings) as this will simplify your workflow by eliminating the need for a second UV channel.
For more details on getting your meshes paint-ready, see the article Preparing your Mesh for painting.
1 location based texture mapping means your paint textures are aligned across any two specified axes (i.e. XY or XZ or YZ) either in world space or relative space.
Case Study:
Now that you are familiar with the basic terms, we’ll look at a few practical examples and choose a material UV node that is best suited for us.
—
Case 1: You have a character receiving hit-damage from a weapon and you want to paint splatter/impact effects on the character at the hit location.
Recommended Workflow: Mesh-space painting via Don_Mesh_Paint_UV1. We’re using UV1 instead of a UV0 because we compulsorily need a lightmap UV for skeletal meshes (and that is typically created in UV1).
—
Case 2: You have a wall or floor and want to make holes, paint graffiti, or draw other effects on them
Recommended Workflow: Local-space painting via Don_Local_Space_XY (for floors) or Don_Local_Space_XZ (for walls). If you need to chain multiple effects-layers, use the Layer1/Layer2 suffixed nodes, eg: Don_Local_Space_XY_Layer1 and Don_Local_Space_XY_Layer2
—
Case 3: Your landscape needs run-time effects such as water/lava or any other per-pixel effect across the landscape.
Recommended Workflow: World-space painting via Don_World_Space_XY. Additional layers can be accessed via the Layer1/Layer2 suffixed nodes.
—
Case 4: You have a complex static mesh that needs seamless painting.
Recommended Workflow: Mesh-space painting via Don_Mesh_Paint_UV1. Although static meshes are not obligated to supply a lightmap channel on UV1, seamless painting is only possible through a lightmap (think of it as a “paintmap”) UV. Ensure that your static mesh has a lightmap channel created on UV1 and that you’re placing the UV1 variant of the mesh painting node in your material.
—
Now let’s take a look at some slightly more complex examples. These are relevant only to those looking to squeeze the last drop of performance / workflow simplification out of the system.
—
Case 5: You have a complex static mesh with a single material and do not care about seamless painting (perhaps because your UV map has very few UV islands)
Recommended Workflow: Mesh-space painting via Don_Mesh_Paint_UV0. Be sure to turn on the setting “Support UV From Hit Results” (under Project->Physics Settings) and “Trace Complex” to true (on your Linetrace/sweep) for this to work.
Note:- 4.16 allows you to “detect material on mesh surfaces” and this feature can theoretically be leveraged to support multiple materials via Collision UV painting. This has not yet been implemented.
—
Case 6: You have a complex static mesh with a single material that needs decal or text projection (i.e. usage of custom brush textures effects or text)
Recommended Workflow: Mesh-space painting via Don_Mesh_Paint_UV0 (if you need 3D projection) or an appropriate local-space/world-space node if you have the ability to approximate your decal projection along any two axes.
Currently, seamless decal/text projection is only supported only for world-space/local-space painting, so if you have just one material and need 3D projection, you can avoid using the (comparatively) heavier positions texture workflow (and the need to create a second UV channel) by leveraging Collision UV support along UV0. You will need to follow the same setup described in Case 5 for this to work.
—
Conclusion:
A simple rule of thumb for most of your usecases will be to use
1) Don_Mesh_Paint_UV1 for non-planar/3D effects
2) Don_World_Space_XY for landscapes
3) Don_Local_Space_XY for floors and
4) Don_Local_Space_XZ for walls.
For optimizing your workflow even further, take the time to consider whether your visual effect can be approximated as a planar surface, whether you need seamless painting, decal projection and whether you can take the fast-path (collision UV support) for static meshes.