Category: Getting Started


Multiplayer Considerations


Introduction

All features provided by this plugin are network-ready out-of-the-box with no additional setup required.

That said, there are some networking considerations you need to be aware of which this document will briefly discuss.

First you will need to ensure that all actors which need paint replication have turned on replication. For Blueprints, tick the “Replicates” checkbox in your class settings. For C++, invoke SetReplicates(true) in your constructor and finally for static mesh actors, tick the “Static Mesh Replicate Movement” checkbox in your world outliner details.


The Server is the Painter

Every paint stroke or pixel collision generated on the server is guaranteed to be replicated to all clients. Therefore, to get your effects network-ready you simply need to ensure that any and all paint activity is routed through the server. Typically, this is achieved through a server RPC function where a client signals the intent to apply a paint effect and the server receives the request and process it.

Here’s an example from the sample project’s BP_Painter_Pawn showing how paint requests from client are always routed to the server for processing:
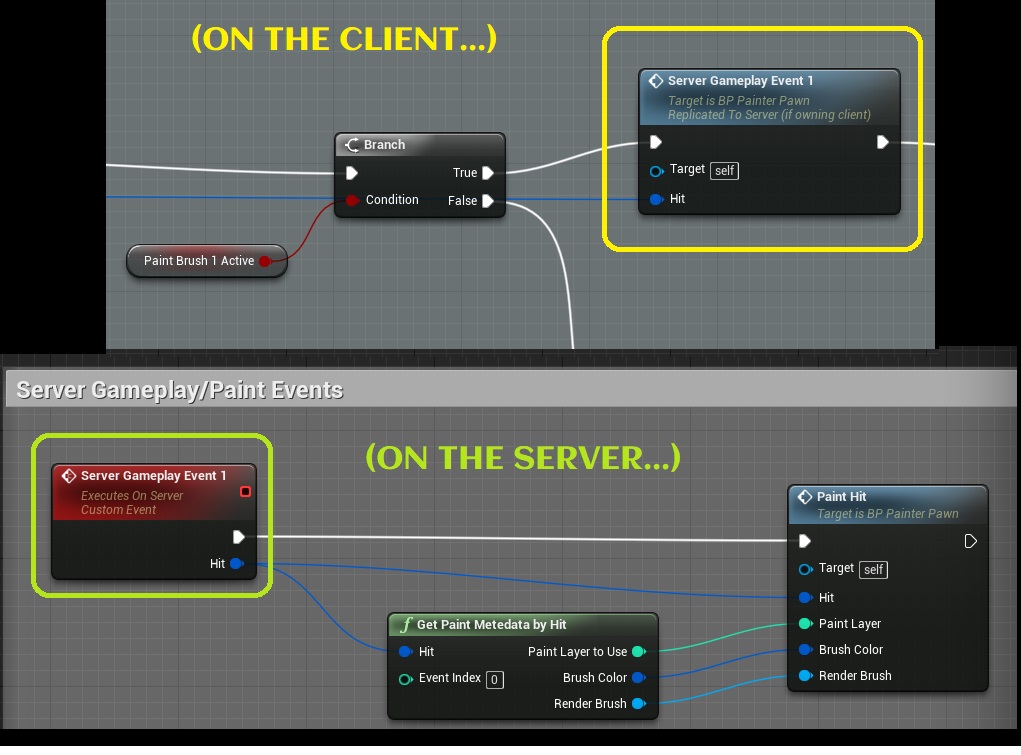
Note:- The functions depicted above are not part of the plugin, they’re just examples from the sample project pawn’s inner working;

if you’re looking for the actual Paint nodes needed to get started with painting, visit the Paint Functions reference and the Quick Start Guide page.


Networked Pixel Collision Queries

Pixel collisions are replicated along with your paint, so along with a copy of the visual effects, all clients also receive an up-to-date copy of collision data.

Whether you choose to run your collision queries only on the server, only on the client, or on server and client is entirely left to you.

Clients have the data needed to perform a predictive check on their local collision data should you desire.


Where do paint strokes made by Clients go?

We discussed earlier that any painting activity performed by the server is guaranteed to reach all the clients (assuming the actor being painted has replication enabled).

However, this is not the case with clients. Paint strokes executed on a client, are client-only, other clients and the server will not see these. As shown in an earlier image, your client will need to communicate its intentions to the server through a Server RPC call at which point the server will process it and if satisfied, replicate it back to all clients (including yourself!)

This brings us to an interesting point. For improving player responsiveness, you may want to always paint on the client first and then inform the server about it after the fact. The plugin allows you to do this, but this workflow has not been rigorously tested so you may run into some edge cases (especially with regards to paint collision).

Where responsiveness is not a primary concern, it is recommended that you always route your paint requests directly to the server and receive the effects back from it.
Preparing your Mesh for painting


Introduction

Before reading this page make sure you’ve reviewed the Quick Start Guide and Choosing your Workflow articles to gain familiarity with some of the terms used here.

The preparation needed for painting on a mesh depends entirely on the UV workflow chosen for painting, so it is good idea to know which workflow (mesh-space / world-space / local-space) you want to use first.


Preparing a Mesh for World-Space/Local-Space Painting

No preparation is necessary. This workflow uses location based UVs so you can get started straight away on any kind of mesh.


Preparing a Mesh for full 3D Painting (Mesh-Space UVs)


Skeletal meshes: A lightmap UV is compulsory for skeletal meshes in this workflow. So in addition to your regular UV map (UV0), you will need to create a simple lightmap UV on UV1. You will need to ensure that every part of your mesh (per-pixel) has a unique coordinate in the lightmap UV you’ve created. Now you should be able to use Don_Mesh_Paint_UV1 to paint without any issues.

Static meshes: A lightmap UV may be necessary for static meshes if you need seamless painting (usually a good thing to have) or if you’re painting across multiple materials. For more information on scenarios where you can get away without a lightmap, see the Choosing your Workflow page.

Why do I need to create a lightmap? The lightmap here serves as a “paintmap”. This UV channel is used to bake positions from your mesh onto a lookup texture that facilitates painting. This is currently the only way to paint on skeletal meshes because they do not support Collision UVs (i.e. translation of a HitResult into a UV coordinate). This is also the only workflow that supports fully seamless painting across UV islands (for procedural brushes, not for decals).

What is the success criteria for a good paintmap? Every pixel of your mesh needs to resolve to a unique coordinate on your lightmap UV. Basically, no overlapping faces allowed. You’ll know your lightmap is off if you’re simply not be able to paint on certain parts of the mesh. This effect is clearly demonstrated if you try to use a UV0 mesh paint node (instead of the prescribed UV1) for 3D mesh painting. Because UV0 can contain overlapping faces, you will never be able to paint on the faces that are overlapped by another because those pixels will get overwritten by a competing face.


Physics Asset and Trace Channel Considerations

Characters need to ensure that they are painting strokes on the skeletal mesh’s physics asset rather than the root collision capsule. This is because the root collision capsule is usually a very rough approximation of your mesh’s actual geometry and the accuracy obtained from this is nowhere near what you need for smooth painting.

So how do you solve this? While tracing your HitResult (from weapons/etc) you can use a trace channel that the skeletal mesh will block, but the capsule doesn’t (eg: use a collision profile where the character’s Mesh blocks the Camera channel while the Capsule ignores it). This is the approach used by the sample project. Another option is to manually route the skeletal mesh component to the PaintStrokeAtComponent function after extracting the skeletal mesh from Hit Result’s actor.

Speaking of Physics Assets, skeletal meshes will need a physics asset that accurately envelops the geometry of mesh (including any WPO offsets). Because the precision of your painting is directly tied to the hit location supplied to the Paint nodes, you won’t get good results unless your physics asset (or collision capsule if you want to go down that route) accurately approximates the pixels of your mesh. It’s pxiels, rather than vertices here, because it really is the pixel locations that are used to determine where a brush stroke should draw paint.


Preparing a Mesh for Decal/Text projection

Again, if you’re using world-space/local-space painting, no further preparation is necessary. Everything will work out-of-the-box .

For mesh-space text/decal stamping, your preparation will lie in UV island management on the lightmap UV. For best results you’ll need to create large, unbroken UV islands across faces that are most likely to receive decals/text. For example, if you’re painting these across a character’s back (for shirt names/numbers/logos like in the sample project), then you’ll want to create your lightmap UV such that the character’s torso has a single, contiguous UV island that has no seams across the back or front.

Here’s the reason why:

Seamless decal/text projection for mesh-space (non-planar) painting  is currently not supported by the plugin. This means that when a UV coordinate has been determined for stamping your decal/text, it will potentially be projected across multiple UV islands, not all of which may be physically co-located with the faces you’re actually targeting. Eg: you could easily move the UV island of a character’s leg right next to the torso and if your decal/text brush size is large enough, then the projection may overflow onto the legs instead of being contained within the torso. To give another example, if the torso were broken into multiple UV islands and placed far away from each other, then a portion of the torso may not receive the effect at all.

Ultimately large contiguous UV islands across important parts of your mesh’s lightmap UV are the best way to mitigate the lack of mesh-space seamless painting for decals/text. Note:- your main UV channel is not bound by these constraints, only your lightmap UV is. You can build your main UV map any way you please.


Creating UMG Text Tattoos


Introduction

You’ll first need to choose the best painting workflow for your usecase. This is especially important for Text, because seamless text/decal projection is currently supported only for world-space / local-space painting.

Therefore, even if your mesh is non-planar1 but your effect can be convincingly a laid out along two axes (for example, a shirt name for a character can probably be laid out along just the YZ plane), then you should favor the local-space/world-space workflow over a full 3D projection (i.e. mesh-space workflow).

Before proceeding further, be sure to read the Choosing your workflow and Preparing your Mesh for painting articles which discuss these topics in more detail.

1 Non-planar refers to complex 3D models that carry significant geometry along all three axes. In contrast, planar models are things like floors/walls/landscapes/etc, all of which can be approximated along any two axes such as XY/XZ/YZ.


Creating Text Effects

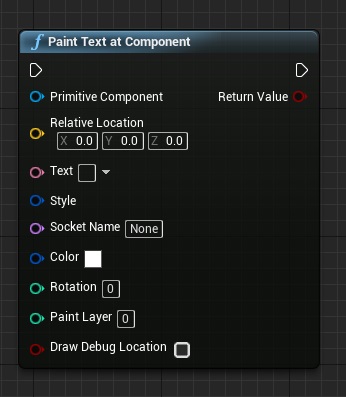
The two main nodes for creating text effects are Paint Text and Paint Text At Component.

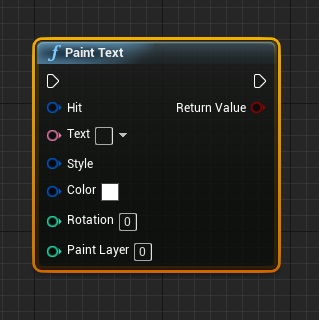
You will invoke these from your Bluperints or C++ code and pass in a Hit Result (or Relative-location/Socket-name) along with your text, font style, etc. These nodes will generate textures that can be read inside your materials to render the text on your meshes.

Here’s what the nodes look like:


For more information on using these nodes, check out the Paint Text and Paint Text At Component reference pages. For now we’ll move on to setting up your materials to receive the text.


Rendering Text Effects

After your Blueprints to create the text effects are in place you’ll need to setup your materials to actually receive your paint.

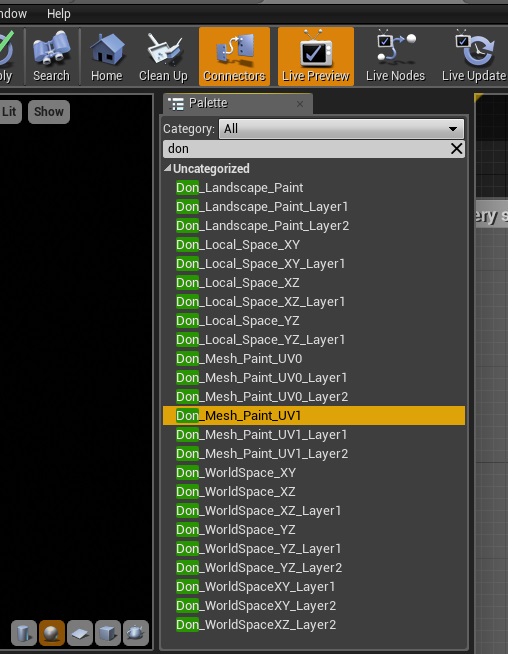
Fortunately all you need is a single material UV node from the following list:

For learning which node you need for your particular usecase, review the choosing your workflow article to ensure you’re choosing an optimal workflow for the task at hand.

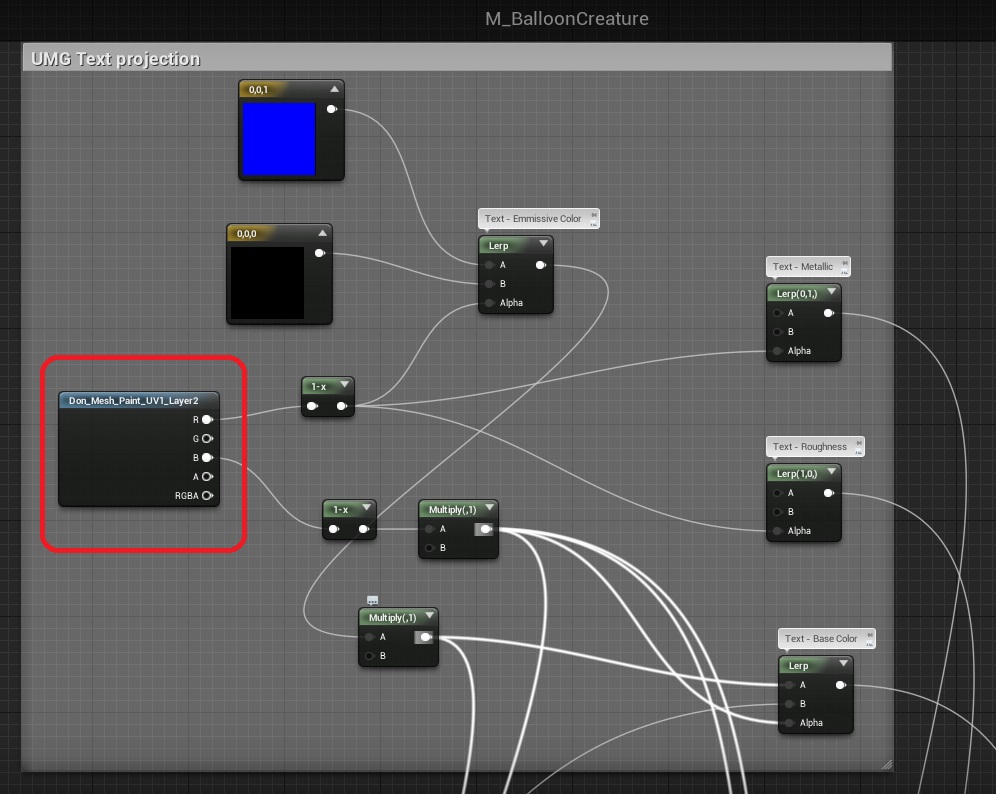
After choosing your node, all you need to do is drop it in your material and use the RGB channels to extract a paint mask. Because Unreal’s Canvas text rendering doesn’t support alphas, the alpha channel is not going to contain any meaningful information and you’ll instead need the RGB channels to pack information. For example, you can use the R channel to control your text’s emmissive/metallic output while the B channel can be used to indicate the actual text mask.

Here’s an example which uses this technique from the sample project’s “UMG hot-text stamping booth”.

Observe how the Don_Mesh_PaintUV1_Layer2 node is used to achieve 3D projection via a lightmap channel on UV1. Layer 2 is used, because Layer 0 and Layer 1 on this material already busy handling other effects not related to text. Using layers is a great way of allowing a single material to use text and paint effects that are fully independent of each other.

It is possible to optimize this example further by approximating shirt names/numbers along the skeletal mesh’s YZ plane by using the Don_Local_Space_YZ workflow. This will yield better performance, a simpler workflow (no need for lightmap UV1) and allow for fully seamless painting (because we’re doing location based planar mapping). This exercise is left as homework to the reader 🙂


Caveats for allowing players to stamp Text

While allowing the player to stamp custom text at a pre-determined socket is easily handled by the Paint Text At Component node, you may be tempted to also allow the player decide where the text is stamped using the Paint Text node.

However, there are some caveats you should be aware of in both cases:

  • If you are allowing players to enter custom text, make sure you restrict the text length, font size or both, to ensure that the text doesn’t overflow across the shirt’s faces.
  • If you are allowing players to choose the text location as well, then a planar workflow (world-space/local-space) is highly recommended over 3d projection (mesh-space workflow).
  • Because 3d text projection is not seamless, your mesh-space UVs (we’re talking about the lightmap UV1 here, not UV0) will need to be very carefully designed to prevent unsightly text spillovers across UV seams. For simple cases like a broad character’s torso you may be able to get away with it, but for things like tattoos on faces, arms, necks, etc, careful lightmap UV prepartion is a must.

Be sure to study the sample project’s “UMG Hot Stamping booth” example to understand the strengths and weaknesses of this plugin’s text painting features.


Driving Global Effects (shared world space painting)


Introduction

The plugin allows you to rapidly create world-aligned textures at runtime which can form the basis of global effect systems (like fog-of-war) with just a few nodes.

Context-free world-space painting using the Paint World Direct node is the relevant workflow. We will use this node to paint a texture mapped along any two world axes (typically XY) and read this texture inside a post-processing material (for the purpose of this example, you can use it for anything though) to create a FoW system.

Make sure you’ve setup your project for world-space painting as described in the world-space UVs reference page.


Creating & updating the global texture

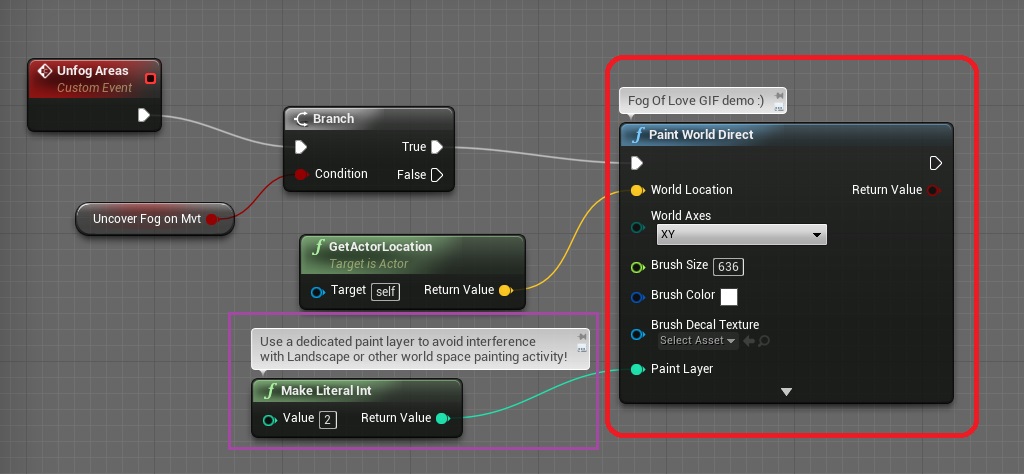
To create a fog-of-war system, we need our pawns to unfog areas as they move around. This is accomplished by using the Paint World Direct node to paint a stroke of desired radius around the pawn’s actor location.

Here is how the sample project achieves this:

“Unfog Areas” is called only when the pawn moves. You don’t need to do this every tick.


Rendering effects from our global texture

Now that we have a texture which tells us precisely which areas our units have unfogged, we just need to use the texture and render the desired effect.

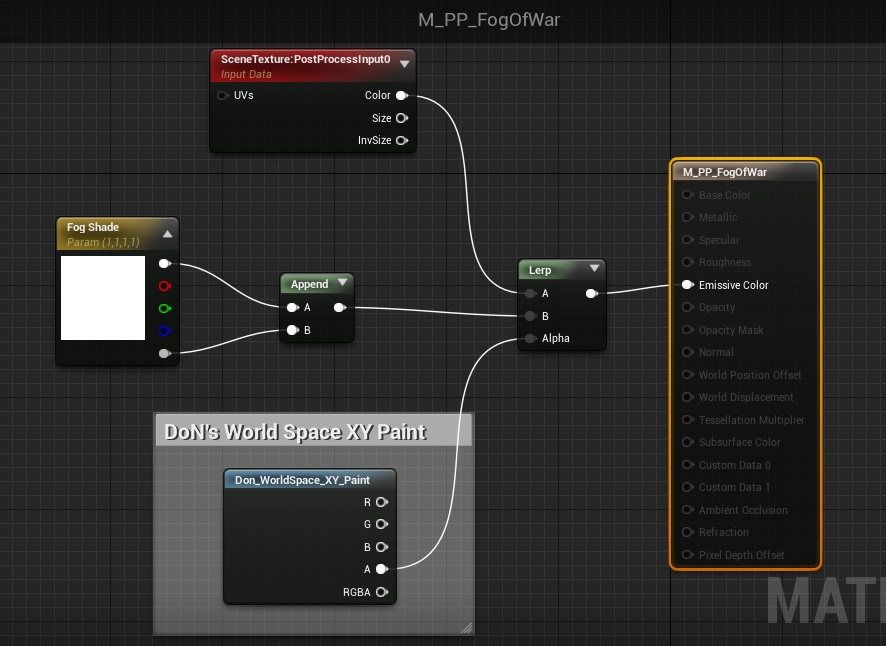
This is achieved with just a single node and a very simple post-process material:

Observe how we’re using the Don_WorldSpace_XY node because we earlier specified that we were only interested in the XY plane while painting our texture.


The End Result

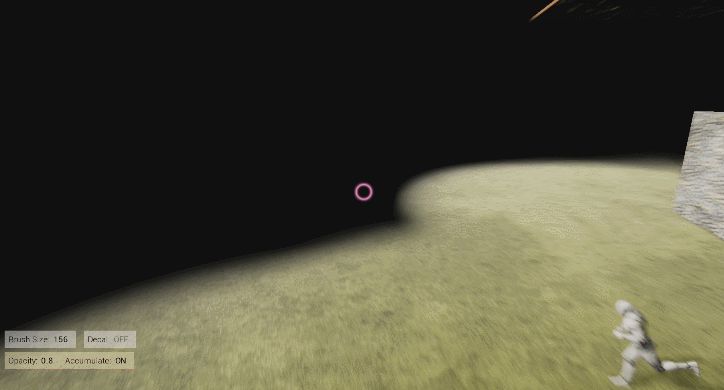
That’s really it! With just a few nodes we have created a simple fog-of-war system:

You can extend this concept in many creative ways to create any kind of global effect/gameplay system you need.

Paint blob collisions will allow you to generate pixel collisions from the areas you have painted allowing you to drive both gameplay and visuals using this technique.


Using Paint Blob Collisions


Introduction

Paint Blob Collisions are a lightweight solution for pixel-driven gameplay collisions that can help your A.I. react to painted areas, modify the behavior of certain parts of a mesh, tag landscape areas with properties that affect gameplay, etc.

The sample project includes examples such as painting lava traps that deal damage to characters, shooting projectiles through holes, modifying A.I. behavior via painted cues (eg: telling the A.I. jump across holes or water), creating blast holes on floors that characters can fall through, etc.

This article will briefly discuss the Blueprint(/c++) nodes needed to get you started. Studying the examples in the sample project is recommended.


Step 1) Creating Collision Tags

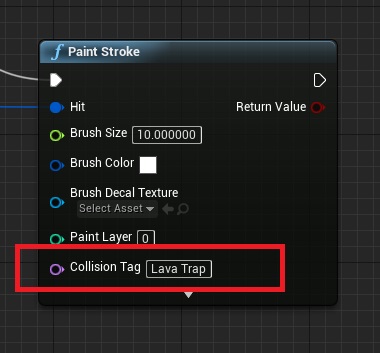
Collision tags are created at the time of painting your effects. You simply need to choose a name for whatever gameplay property the collision is used for and send that over to a paint node. Here’s an example that assigns a “Lava Trap” collision tag to a blob of paint:

Your brush size (typically measured in world space units) determines the extent of the paint collision. With this in place, we can now query any world space location around this blob and use it to deal damage to characters/A.I./etc. 

For more information on using the Paint Stroke node see the Paint Functions reference page and also the Quick start guide.


Step 2) Querying Collision Tags

Unlike Unreal’s physx collision which has the ability to notify you whenever a collision takes place (on account of its deep integration with actor movement/translation), Paint blob collisions currently require you to manually query collision at suitable time intervals. This can be as infrequent as when your actor hits another mesh (and you receive a OnComponentHit notification, which is the typical workflow for portals/projectiles/etc) or as frequent as every tick (n.b. the query functions are extremely fast) for allowing players to paint rivers of lava that deal instant damage to anything in its vicinity.

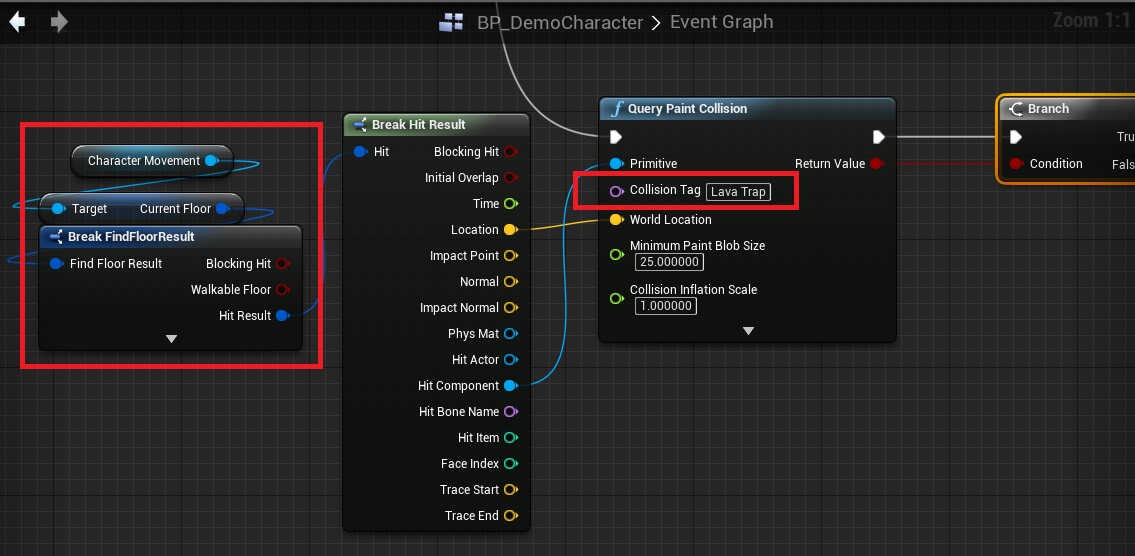
Going back to the previous example of a Lava trap, here’s how you can use a Query node to find out whether a given location (such as a character’s feet) is touching our lava:

Observe how this example uses the Character’s current floor to extract both the floor location and the primitive surface (eg: a landscape). By setting a minimum blob size that is high enough, we can ensure that the condition triggers only when the lava blob is beyond a desired size.

If the query function returns true, we can now do things like dealing damage to the character, splashing lava on its legs (the sample project does this using the Paint Stroke At Component node), etc.

Open the sample project’s BP_DemoCharacter blueprint and study the “Paint Collision Check” event to see this in action.

As the sample project has multiple usecases to satisfy, it uses the advanced “Query Paint Collision Multi” node which allows multiple simultaneous queries, bucketing of queries by blob size and more.


Firing Projectiles Through Holes

The plugin comes with a ready-to-use portal projectile component that is fully compatible with all your existing projectiles!

Just reparent your projectile to the “Don Smart Projectile Component”, add list of “Paint Portal Names” and you’re good to go. The portal names are just the same collision tags you passed earlier while painting your portals with the paint nodes.

The size of your projectile will be automatically detected using the root component of your projectile actor (it needs to be a collision body like Unreal’s FPS template projectiles). This size will be used to determine the minimum paint blob size needed for passing through.


Advanced Usecases

For more advanced examples check out the “Paint Collisions” section of the sample project.


Quick Start Guide


Using DoN’s Mesh Painting Plugin

The basic workflow involves using a Paint node in your blueprints/code (for creating your effects) with a Material UV node in your materials (for rendering the effects).

Depending on the mesh, type of effect, etc, various Paint and UV nodes are available and can be combined in different ways. Finally, If you’re interested in driving gameplay from painted pixels, a Query node can be used to leverage paint blob collisions.


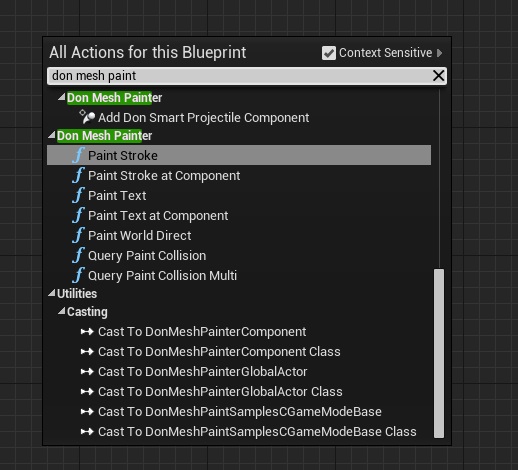
Step 1) To get started, open your context menu and search for “Don Mesh Paint” to see the list of Paint nodes available:

(C++ users will find the same API exposed in DonMeshPaintingHelper.h)


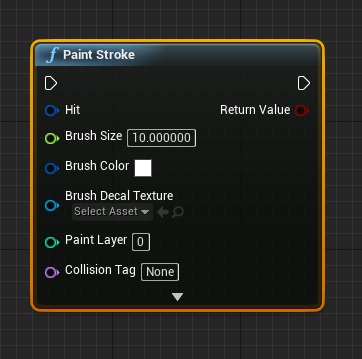
Step 2) Paint Stroke is the most common paint node you’ll be using. You need to provide a HitResult (from collisions, cursor hits, etc) and the paint effect will be routed to all materials of the hit component, assuming they have a Don UV node setup.

Here’s what a paint node looks like:

See the Paint Nodes Reference page to learn more about the various painting nodes available and the parameters that you can control.


Inside the Material Editor

After your code/blueprints is setup to paint effects, you’ll need to configure the materials on your character/mesh for receiving paint. You can reuse any of your existing materials and effects as you like, there is no need to create a new material.


Step 3) In your Material Editor, open the palette to your right and search for “Don” to see the list of UV workflows available.


Which UV node should I choose for my material?

It depends on what kind of mesh you’re painting and the overall effect you’re going for, but here’s a quick cheat-sheet:

  • Characters will typically need Don_Mesh_Paint_UV1 (We use UV1, not UV0; characters need a dedicated lightmap UV)
  • Landscapes: Don_WorldSpace_XY is ideal
  • Floors: Don_Local_Space_XY
  • Walls: Don_Local_Space_XZ

For a comprehensive treatment of this subject, be sure to read the articles Which UV Workflow should i choose? and Preparing your Mesh for painting.


Step 4) Let’s see what a UV node looks like in action:

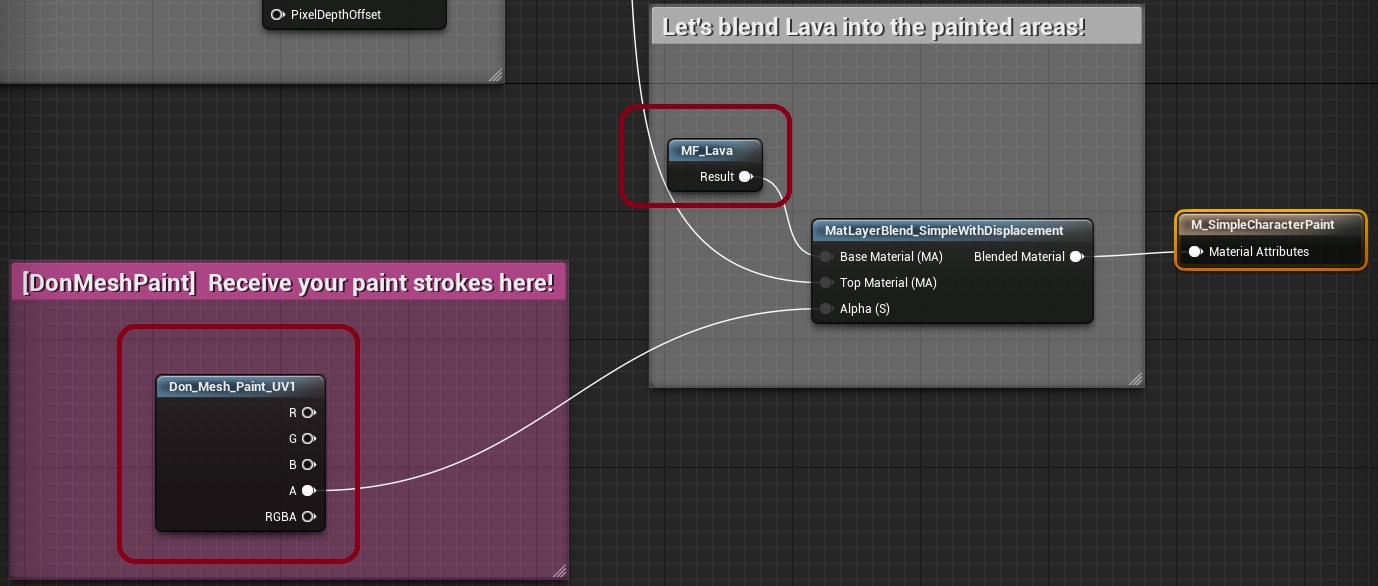
In this example from the sample project, we have a character that is receiving a Lava effect on Hit. Observe how the effect is sourced from the Don Mesh Paint node’s Alpha channel and blended in:

 Note 1: To enable a single “Material Attributes” input as used by the M_SimpleCharacterPaint node above (instead of the regular material output pins), you can simply click on that node and check the “Use Material Attributes” in the Details Panel.

 Note 2: The plugin does not require you to change your existing material setups in this manner. The above setup is purely for visual cleanliness; if you prefer you may continue using the regular material output pins and blend in any channels you’re interested in using.


Putting it all together

Here’s a finished example from the sample project in action.

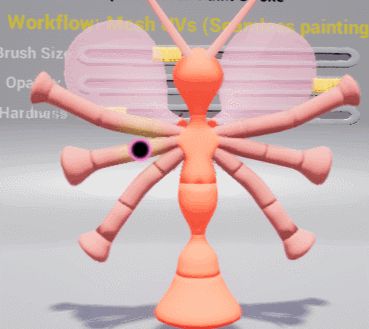
This example works by first taking the UMG reticle position and obtaining a Hit Result from it (see U_SimpleHUD in the sample project). The demo pawn then supplies this Hit to PaintStroke (see BP_PainterPawn). Finally, the materials of the skeletal mesh (see M_SimpleCharacterPaint) are configured to receive paint in the form of mesh-space UVs.


Sample Project Downloads

4.18 https://drive.google.com/open?id=1xj79l9ZvXirV92eBb4vtAbLvhZCbAA3n

4.17 https://drive.google.com/open?id=0ByqN_J5XY2wjdTZLT1RsdTJtNGc

4.15 – 4.16 https://drive.google.com/open?id=0ByqN_J5XY2wjaFVmN29aTmZLT0k

The sample project has several examples of mesh painting and more. You can open the materials of any mesh to see how the Don material nodes are used to blend in effects. BP_PainterPawn is the blueprint which does all the painting for the demo project. This blueprint is somewhat complex (because of the broad nature of the sample project), but for your purposes you will simply need one of the Paint nodes and pass in the parameters relevant for your usecase/project.